Table of Contents
Calling all pastry lovers! Are you ready to embark on a culinary adventure to Portugal? Today, we're diving into the world of pasteis de nata, those irresistible custard tarts that have captured hearts (and stomachs) worldwide. While they may seem intimidating, creating these little gems is easier than you think. With a few simple ingredients and a bit of patience, you can whip up a batch of these delightful treats right in your own kitchen. This easy pasteis de nata recipe, perfect for beginners, will guide you through every step, from making the creamy custard to achieving that iconic crispy crust. So grab your apron, gather your ingredients, and let's get baking with tauhuichiban!
Ingredient | Purpose | Tips |
|---|---|---|
Custard | Creates the creamy filling | Use high-quality vanilla extract for rich flavor. |
Pastry | Forms the crispy shell | Chill the dough thoroughly for easier handling. |
Baking | Achieves the golden brown crust | Bake at a high temperature for a crispy exterior. |
Serving | Enhances the taste | Dust with cinnamon and powdered sugar for a classic touch. |
Get Baking: The Easiest Pasteis De Nata Recipe Ever!
Unlocking the Secrets to an Easy Pasteis de Nata Recipe
Demystifying the Delicious: It's Easier Than You Think!
Let's be honest, those golden-brown, custard-filled pasteis de nata look pretty fancy, right? Like something you'd only order in a fancy bakery with a name you can't pronounce. But guess what? Making them at home is way easier than you think! It's like the first time I tried baking a cake – I thought it'd be a disaster, but it turned out everyone loved it (even if it was a little lopsided!). This easy pasteis de nata recipe is your ticket to pastry chef glory, minus the stress.
Breaking Down the Process: From Simple Ingredients to Showstopping Treats
Think of this recipe like building a Lego masterpiece (but way tastier, of course!). You've got your custard building blocks – eggs, sugar, milk, a touch of flour for that silky texture, and a dash of vanilla for warmth. Then there's the crispy pastry foundation – ready-made puff pastry makes this step a breeze! No need to knead or roll out dough like a pro. Just imagine, you'll be popping these little beauties out of the oven, impressing your family and friends with your newfound baking prowess!
Unlocking the Secrets to an Easy Pasteis de Nata Recipe
The Perfect Pairing: Crafting the Creamy Custard and Crispy Crust for Your Easy Pasteis de Nata Recipe
The Custard: It's All About That Smooth Move!
Imagine the smoothest, silkiest pudding you've ever had – that's what we're going for with this custard! It's like magic, really. You start with simple things like eggs, sugar, and milk. Then, a touch of flour works behind the scenes, making the custard thick and luxurious. It's like adding a secret ingredient that makes everyone go "Wow, how did you do that?". A splash of vanilla is like adding a warm hug to the whole mixture – pure comfort in every bite!
The Crust: Think Crispy, Flaky, and Buttery Delicious!
Okay, forget about complicated pastry doughs that make you want to tear your hair out! We're using store-bought puff pastry, which is like the superhero of the baking world. It comes ready to bake and puffs up into these beautiful, golden layers. Imagine a croissant – light, airy, and bursting with buttery flavor. That's the magic of puff pastry! And the best part? It makes this easy pasteis de nata recipe even easier!
Custard Ingredients | Crust Ingredients |
|---|---|
Eggs | Puff Pastry |
Sugar | (and that's it!) |
Milk | |
Flour | |
Vanilla Extract |
The Perfect Pairing: Crafting the Creamy Custard and Crispy Crust for Your Easy Pasteis de Nata Recipe
Easy Pasteis de Nata Recipe: Tips and Tricks for Baking Like a Portuguese Pastry Chef
Mastering the Bake: It's All About Timing!
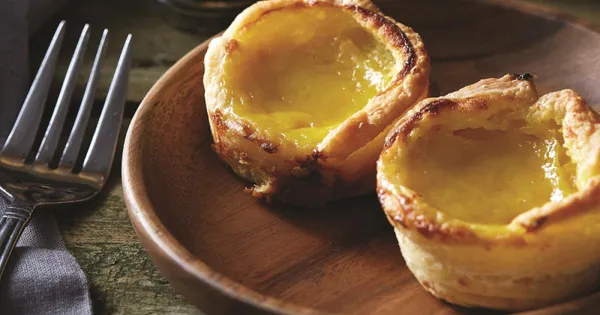
Think of baking these little custard tarts like a dance – it's all about timing and rhythm. You want the custard to be set but still jiggly in the middle, and the crust to be golden brown and crispy. It's like that time I tried to make cookies for my friend's birthday. I thought I had the timing down, but they ended up a little overdone. Lesson learned! The key is to keep a close eye on your oven and don't be afraid to check on your tarts every few minutes. You'll know they're ready when the top is slightly browned and just a little bit blackened – that's the authentic Portuguese touch!
The Finishing Touches: Elevate Your Pasteis de Nata Game
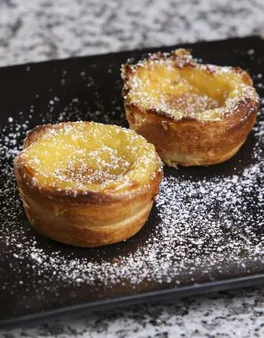
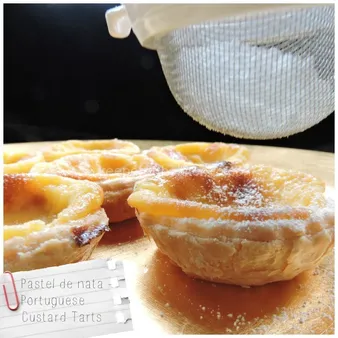
Okay, so your pasteis de nata are out of the oven and cooling, looking all golden and delicious. But there's one more trick to make them truly special! Sprinkle some powdered sugar on top – it's like giving them a little dusting of magic. And don't forget the cinnamon! A light sprinkle of cinnamon adds a warm, cozy flavor that will make everyone say, "Wow, these are amazing!" Think of it like adding a little sprinkle of love to your already delicious creation. Trust me, it makes all the difference!
Tip | Purpose |
|---|---|
Check on your tarts every few minutes | To ensure they don't overbake |
Sprinkle powdered sugar and cinnamon | To add a final touch of sweetness and warmth |
- Use a high-quality vanilla extract for a richer flavor.
- Chill the dough thoroughly for easier handling.
- Bake at a high temperature for a crispy exterior.
- Serve warm for the best taste and texture.
Easy Pasteis de Nata Recipe: Tips and Tricks for Baking Like a Portuguese Pastry Chef
Final Thought
Now you're equipped with the knowledge to create your own batch of delicious pasteis de nata! Remember, practice makes perfect, so don't be discouraged if your first attempt isn't quite picture-perfect. With each batch, you'll gain confidence and master the art of making these iconic Portuguese treats. So gather your friends and family, share your creations, and celebrate the joy of homemade baking. Enjoy!