Table of Contents
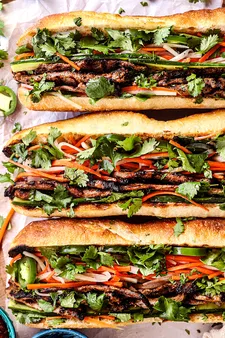
Are you ready to embark on a culinary adventure and learn How to make bánh mì, the beloved Vietnamese street food that has captivated hearts worldwide? On our website, Tauhuichiban, we're sharing the secrets to crafting the perfect bánh mì, from gathering the essential ingredients to assembling the delectable symphony of flavors. Whether you're a seasoned cook or a culinary novice, our step-by-step instructions and tips will guide you towards bánh mì mastery. So, grab your aprons and let's dive into the world of Vietnamese street food!

How to Make Bánh Mì: A Step-by-Step Guide to Vietnamese Sandwich Mastery
I. Gather and prepare the ingredients
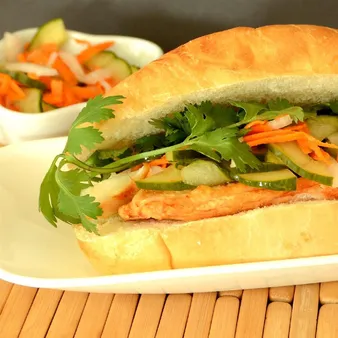
You’ll need a few pantry staples for the bánh mì filling, like a good quality fish sauce, soy sauce, rice vinegar, sugar, plus garlic and chiles. (If you don’t have unseasoned rice vinegar, seasoned rice vinegar will work too, but reduce the sugar content to 2 tsp.) For the vegetables, you’ll需要 a few key items, mostly likely already in your crisper drawer: carrots (which provide natural sweetness), daikon (a mild-flavored Japanese radish that contributes delightful crunch), and jalapeño (for a hint of heat). Pick up some fresh cilantro, too. And of course, the centerpiece of this sando: a crusty, airy baguette or other crusty bread.
Start by making the pickling liquid. In a small saucepan, combine rice vinegar, sugar, and ¼ cup of water. Set over medium-high heat and bring to a boil. Taste the liquid–it should have a balanced sweet-tart flavor. If it’s too sweet, add a little more vinegar. If it’s too tart, add a little more sugar. Once you’re happy with the taste, turn off the heat, add the sliced carrots and daikon, and let cool in the liquid. The 20-minute cooling process pickles the vegetables lightly, infusing a bit of tang and taking the raw edge off. But if you don’t have the time, no worries. You can add the vegetables to the sauce right away; they’ll still absorb some of the flavors.
Carrot | Daikon | Jalapeño |
|---|---|---|
1 medium carrot, peeled and thinly sliced | ½ cup daikon, peeled and thinly sliced | 1 jalapeño pepper, stemmed, seeded, and thinly sliced |
Make the sauce
Next, make the sauce that brings everything together. In a bowl, whisk together fish sauce, soy sauce, sugar, garlic, and lime juice. Once the pickling liquid has cooled, add the carrots and daikon to the bowl and stir to combine.

Gather and prepare the ingredients
II. Create the dough
The foundation of a great bánh mì lies in its dough, which should be soft, airy, and slightly chewy. To achieve this, we'll combine flour, water, yeast, sugar, and salt in a large bowl. The yeast will feed on the sugar and produce carbon dioxide, which will create air pockets in the dough, giving it its characteristic lightness. Once the dough is mixed, we'll knead it for several minutes until it becomes smooth and elastic. This process will develop the gluten in the flour, which will give the dough its strength and structure.
Once the dough is ready, we'll let it rise in a warm place for about an hour, or until it has doubled in size. This will give the yeast time to further ferment and produce more carbon dioxide, which will make the dough even lighter and airier. After the dough has risen, we'll punch it down to release the excess gas and then divide it into equal portions. These portions will then be shaped into baguettes or rolls and placed on a baking sheet. We'll let them rise for another 30 minutes or so, or until they have doubled in size again. Finally, we'll bake the baguettes or rolls in a preheated oven until they are golden brown and crusty.
Ingredient | Amount |
|---|---|
Flour | 3 cups |
Water | 1 1/2 cups |
Yeast | 1 tablespoon |
Sugar | 1 tablespoon |
Salt | 1 teaspoon |
Once the baguettes or rolls are baked, they can be enjoyed on their own or used to make sandwiches, banh mi, or other dishes. They are a versatile and delicious bread that can be enjoyed for breakfast, lunch, or dinner.
Here are some tips for making the perfect bánh mì dough:
- Use bread flour, which has a higher protein content than all-purpose flour, for a chewier bread.
- Make sure the water is warm, but not hot, as this will kill the yeast.
- Knead the dough for at least 5 minutes, or until it becomes smooth and elastic.
- Let the dough rise in a warm place for about an hour, or until it has doubled in size.
- Punch down the dough and divide it into equal portions before shaping it into baguettes or rolls.
- Let the baguettes or rolls rise for another 30 minutes or so, or until they have doubled in size again.
- Bake the baguettes or rolls in a preheated oven until they are golden brown and crusty.
With a little practice, you'll be able to make perfect bánh mì dough every time.
Here are some related articles that you may find helpful:
- How to Make Authentic Chinese Dumplings
- The History and Culture of Chinese Tea
- The Best Chinese Restaurants in Your City

Create the dough
III. Proof the dough
After kneading, the dough needs time to rest and rise. This process, known as proofing, allows the yeast to ferment the sugars in the flour and produce carbon dioxide gas. The gas bubbles expand and create a network of tiny pockets within the dough, giving it its characteristic light and airy texture.Secrets of Making Authentic Sourdough Bread
The ideal temperature for proofing is between 70 and 80 degrees Fahrenheit (21 to 27 degrees Celsius). The dough should be placed in a warm, draft-free place and covered with a damp cloth or plastic wrap to prevent it from drying out.The proofing time will vary depending on the type of flour used, the amount of yeast added, and the temperature of the environment. As a general rule, dough made with bread flour will proof faster than dough made with all-purpose flour. Dough made with more yeast will also proof faster than dough made with less yeast. And dough that is proofed in a warm environment will proof faster than dough that is proofed in a cool environment.Here is the basic guide to proofing times:
- Dough made with bread flour: 1-2 hours
- Dough made with all-purpose flour: 2-3 hours
- Dough made with more yeast: 1-1.5 hours
- Dough made with less yeast: 2-3 hours
- Dough proofed in a warm environment (70-80 degrees F): 1-2 hours
- Dough proofed in a cool environment (60-70 degrees F): 2-3 hours

Proof the dough
IV. Fill and bake the dough
Once the dough has risen, it's time to fill and bake it. You can use any type of filling you like, but some popular options include cheese, pepperoni, sausage, and vegetables. To fill the dough, simply spread your desired toppings evenly over the surface. Then, bake the pizza in a preheated oven at 450 degrees Fahrenheit for 10-15 minutes, or until the crust is golden brown and the cheese is melted and bubbly.
Here are some tips for filling and baking your pizza:
- Don't overload the pizza with toppings. Too many toppings can make the pizza soggy.
- If you're using fresh vegetables, be sure to cook them before adding them to the pizza. This will help to prevent the pizza from becoming watery.
- Bake the pizza on a preheated baking stone or pizza pan. This will help to create a crispy crust.
- Keep an eye on the pizza while it's baking. You don't want to overcook it, or the crust will become dry and tough.
Once the pizza is baked, let it cool for a few minutes before slicing and serving. Enjoy!
Topping | Amount |
|---|---|
Cheese | 1 cup |
Pepperoni | 1/2 cup |
Sausage | 1/2 cup |
Vegetables | 1 cup |
Here are some additional tips for making the perfect pizza:
- Use a high-quality flour. This will make a big difference in the taste and texture of the crust.
- Let the dough rise in a warm place. This will help to develop the flavor and make the crust light and airy.
- Don't overwork the dough. Overworking the dough will make it tough.
- Bake the pizza on a hot stone or pan. This will help to create a crispy crust.
- Don't be afraid to experiment with different toppings. There are endless possibilities when it comes to pizza toppings.
With these tips, you'll be able to make a delicious pizza that everyone will love.
Here are some popular pizza topping combinations:
- Cheese and pepperoni
- Sausage and peppers
- Bacon and pineapple
- Chicken and barbecue sauce
- Vegetable medley
No matter what toppings you choose, you're sure to enjoy a delicious pizza that's perfect for any occasion.

Fill and bake the dough
V. Conclusion
As you embark on your bánh mì-making journey, remember that patience and attention to detail are key. Allow the dough ample time to rise, ensuring a light and airy texture. Season the meats generously and grill them to perfection, infusing them with smoky flavors. Layer the fillings harmoniously, balancing the textures and flavors to create a symphony of taste. With each bite, savor the culmination of your culinary efforts, appreciating the vibrant flavors and textures that define the beloved bánh mì. Whether you choose to follow our classic recipe or experiment with your own variations, may this guide inspire you to create countless delicious and memorable bánh mì experiences.