Table of Contents
Have you ever heard of a clafoutis? It’s a French dessert that’s like a cross between a custard and a pancake, and it’s incredibly easy to make. Think of it as a delightful way to showcase seasonal fruit, and it’s always a hit with everyone, from kids to grown-ups. You’ll find that making a clafoutis is a breeze, and it’s a great way to impress your friends and family with a simple yet graceful dessert. Today, we’ll be taking a deep investigate into the world of clafoutis, exploring the key ingredients, techniques, and tips for making a perfect clafoutis. We’ll also share some creative variations to help you find your favorite flavor combinations. So grab your apron, gather your ingredients, and let’s get started on this delicious French journey!
The Ultimate Clafoutis Recipe: Easy & Delicious
The Clafoutis: A French Dessert for Any Occasion
The clafoutis is like a warm hug on a chilly day, a sweet reminder of sunshine even when it's raining outside. It's a French dessert, and let me tell you, the French know a thing or two about good food! Imagine a custard, but instead of being smooth and creamy, it's got a delicate texture, like a soft pancake. And the best part? It's packed with juicy, delicious fruit! You can use cherries, berries, or even peaches – whatever's in season. Honestly, it's so easy to make that even a kid could do it. It's perfect for a casual weeknight dessert or a fancy dinner party, and it always leaves everyone wanting more. You can even make it ahead of time and warm it up later, which is a lifesaver when you're busy.
Fruit | Season | Flavor |
|---|---|---|
Cherries | Spring/Summer | Sweet and tart |
Berries | Summer | Sweet and tangy |
Peaches | Summer | Sweet and juicy |
Making the Clafoutis Batter: A StepbyStep Guide
The clafoutis batter is super simple, and you can make it in just a few minutes. You'll need some basic ingredients: eggs, milk, flour, sugar, and a touch of vanilla extract. The secret to a good clafoutis is in the batter, which should be smooth and silky, like a luxurious cream. If you're feeling adventurous, you can add a dash of almond extract for an extra flavor boost.
I like to whisk everything together by hand, but if you're short on time, a blender is a great shortcut. Just make sure to blend it until the batter is completely smooth and lump-free.
- Eggs: These are the heart of the clafoutis, adding richness and structure.
- Milk: This gives the clafoutis its creamy texture.
- Flour: This helps to thicken the batter and gives the clafoutis its soft, pancake-like texture.
- Sugar: This adds sweetness and a hint of caramel flavor.
- Vanilla Extract: This adds a warm, comforting flavor.
- Almond Extract: This is optional, but it gives the clafoutis a nutty flavor.
Choosing Your Fruit: A Clafoutis Flavor Trip
The clafoutis is all about the fruit, so choose wisely! You can use fresh or frozen fruit, and there are no limits to your creativity. If you're looking for a classic flavor, cherries are a great choice. Their sweet and tart flavor pairs perfectly with the creamy batter. But don't be afraid to get creative! Berries, peaches, plums, apples, pears – the possibilities are endless!
I like to use a mix of different fruits for a more complex flavor profile. For example, I might use a combination of cherries and blueberries, or peaches and raspberries. You can also add a little bit of citrus zest to your fruit for a refreshing twist.
I love using seasonal fruit for my clafoutis. It's not only delicious, but it also supports local farmers. Plus, there's something special about enjoying a dessert made with fresh, in-season fruit.
No matter what fruit you choose, make sure to arrange it evenly in the baking dish. This will ensure that all of the fruit gets cooked evenly and that you get a beautiful, even distribution of flavor in every bite.
I like to use a cast iron skillet for my clafoutis. It helps to create a crispy crust on the bottom of the clafoutis, and it also makes it easy to serve. You can also use a pie pan or a baking dish. Just make sure to butter the dish before you add the fruit.
Now, let's talk about the baking process. A clafoutis is baked in the oven, and it's important to bake it until it's just set. This means that the center should be slightly jiggly but not runny. If you overbake it, the clafoutis will become dry and rubbery.
The baking time will vary depending on the size of your baking dish and the type of fruit you're using. But generally, you'll need to bake it for about 30-45 minutes.
One of my favorite tips for baking a clafoutis is to sprinkle sugar on top before baking. This helps to create a beautiful, caramelized crust.
Another tip is to use a cake tester to check if the clafoutis is done. Insert it into the center of the clafoutis, and if it comes out clean, it's ready!
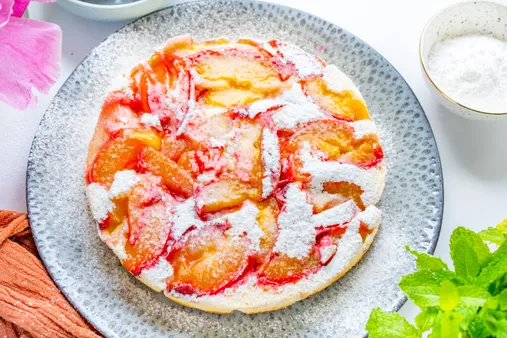
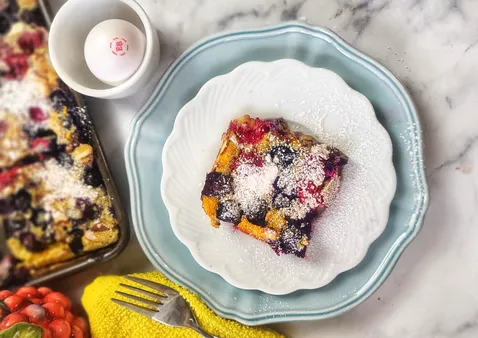
Now, let's talk about serving. A clafoutis is best served warm, but it's also delicious at room temperature. I like to serve it with a dollop of whipped cream or a scoop of vanilla ice cream. You can also sprinkle it with powdered sugar or chopped nuts for a little extra crunch.
And that's it! The clafoutis is a simple, simple dessert that's perfect for any occasion. So grab your ingredients and get baking!
- Use fresh or frozen fruit.
- Arrange the fruit evenly in the baking dish.
- Bake the clafoutis until it's just set.
- Serve the clafoutis warm with a dollop of whipped cream or a scoop of vanilla ice cream.
Baking the Clafoutis: Tips for Perfect Results
You've got the batter, you've got the fruit, now it's time to bake! This is where it gets fun, and where you can really make your clafoutis shine. You'll want to preheat your oven to 350°F (180°C) and butter a 9-inch cast iron skillet, pie pan, or baking dish. This will ensure that your clafoutis doesn't stick to the pan and that it gets a nice golden brown crust.
Once the oven is preheated, pour the batter over the fruit in the pan. Make sure it's evenly distributed, and don't worry if the fruit sinks to the bottom – that's part of the charm! Sprinkle a little extra sugar on top for a caramelized crust.
Bake for about 30-45 minutes, or until the clafoutis is set. This means that the center should be slightly jiggly, like a custard, but not runny. You can check for doneness by inserting a cake tester into the center of the clafoutis. If it comes out clean, it's ready!
Once the clafoutis is done, let it cool for a few minutes before serving. This will help it to set and make it easier to slice.
Now, for some tips on how to make your clafoutis even more delicious:
If you want a more intense flavor, you can add a little bit of almond extract to the batter.
For a more caramelized crust, sprinkle a little bit of sugar on top of the clafoutis before baking.
To make sure that the fruit cooks evenly, you can place a baking sheet on the rack below the clafoutis. This will help to prevent the bottom of the clafoutis from burning.
If you're short on time, you can use frozen fruit in your clafoutis. Just make sure to drain it well before adding it to the batter.
And finally, don't be afraid to experiment with different flavors! You can add a little bit of lemon zest or orange zest to the batter for a refreshing twist. You can also add a pinch of cinnamon or nutmeg for a warm, comforting flavor.
The possibilities are endless! So get creative and have fun with it.
Remember, a clafoutis is a simple dessert, but it's also a delicious one. It's perfect for a casual weeknight dessert or a fancy dinner party. So next time you're looking for a new dessert to try, give the clafoutis a shot. You won't be disappointed!
If you're looking for more dessert recipes, check out my other posts on my website. I have a recipe for Queen Amann, which is a delicious French pastry, and a recipe for Portuguese egg tarts, which are a classic Portuguese dessert.

The Clafoutis: A French Dessert for Any Occasion
Making the Clafoutis Batter: A StepbyStep Guide
The batter is the backbone of the clafoutis, like the foundation of a house. It's simple, but it makes all the difference. You'll need eggs, milk, flour, sugar, and a splash of vanilla extract. Think of it as a creamy, silky hug for your fruit.
I like to whisk everything together by hand, but if you're short on time, a blender is a lifesaver. Just make sure to blend it until it's smooth like a baby's bottom, no lumps allowed!
My favorite thing about the clafoutis batter is that it's so versatile. You can add a little almond extract for a nutty twist, or even a touch of lemon zest for a refreshing zing.
If you're feeling adventurous, you can even try adding a little bit of cocoa powder to the batter for a chocolatey clafoutis. It's a delicious way to add a little bit of decadence to your dessert.
But no matter how you choose to make it, the batter is the key to a perfect clafoutis. It's the secret ingredient that brings everything together.
Once you've got your batter made, you're ready to add the fruit! But before we get to that, let's talk about the fruit itself.
Making the Clafoutis Batter: A StepbyStep Guide
Choosing Your Fruit: A Clafoutis Flavor Progression
The Classic Cherry Clafoutis: A Sweet and Tart Delight
Cherries are my go-to fruit for clafoutis. They're like the rockstars of the clafoutis world. Their sweet and tart flavor is the perfect match for the creamy batter. The contrast of flavors is just so satisfying, like a little dance party happening in your mouth. And don't even get me started on how pretty they look, all nestled in the batter, like little jewels.
If you're looking for a classic clafoutis experience, you can't go wrong with cherries. They're the perfect introduction to this delicious dessert. But you know me, I'm always up for a little experience!
Beyond Cherries: Exploring the World of Clafoutis Flavors
Who says you have to stick with just one type of fruit? Get crazy, mix it up, and try something new! Berries are always a good choice. They're sweet and tangy, and they add a pop of color to your clafoutis. I love using a mix of blueberries and raspberries. It's like a little summer party in your mouth.
Peaches are another great option, especially if you're looking for a more delicate flavor. They're sweet and juicy, and they add a touch of elegance to your clafoutis. You can even try adding a little bit of lemon zest to your peaches for a refreshing twist.
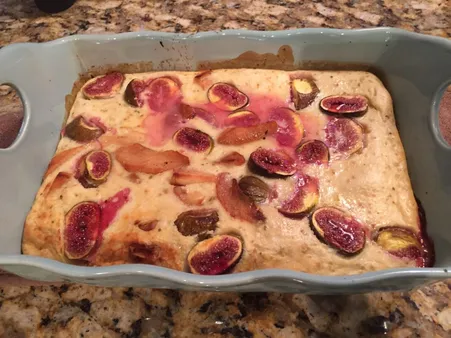
And don't forget about plums! They're a little bit tart and a little bit sweet, and they add a unique flavor to your clafoutis. I love using a mix of plums and berries for a truly unique flavor combination.
No matter what fruit you choose, make sure to arrange it evenly in the baking dish. This will ensure that all of the fruit gets cooked evenly and that you get a beautiful, even distribution of flavor in every bite.
I like to use a cast iron skillet for my clafoutis. It helps to create a crispy crust on the bottom of the clafoutis, and it also makes it easy to serve. You can also use a pie pan or a baking dish. Just make sure to butter the dish before you add the fruit.
Fruit | Season | Flavor |
|---|---|---|
Cherries | Spring/Summer | Sweet and tart |
Berries | Summer | Sweet and tangy |
Peaches | Summer | Sweet and juicy |
Plums | Late Summer/Fall | Tart and sweet |

Choosing Your Fruit: A Clafoutis Flavor Progression
Baking the Clafoutis: Tips for Perfect Results
Alright, you've got your batter, you've got your fruit, and you're ready to bake! This is the exciting part, like watching a magic trick unfold. You'll want to preheat your oven to 350°F (180°C) and butter a 9-inch cast iron skillet or pie pan. This is like giving your clafoutis a cozy little bed to rest in, so it doesn't stick and gets that yummy golden brown crust.
Once the oven's hot, pour the batter over the fruit in the pan. Make sure it's all spread out evenly, like a blanket of cream over a bed of fruit. Don't worry if the fruit sinks to the bottom – that's part of the charm! Then, sprinkle a little extra sugar on top, like a sprinkle of fairy dust, to give it that caramelized crust.
Now, pop it in the oven for about 30-45 minutes, until the clafoutis is set. This means that the center should be slightly jiggly, like a wobbly jelly, but not runny. You can check if it's done by poking it with a toothpick or a cake tester. If it comes out clean, it's ready!
Once it's out of the oven, let it cool for a few minutes before serving. This helps it set and makes it easier to slice.
Here are some tips to make your clafoutis even more delicious:
If you want a more intense flavor, you can add a little bit of almond extract to the batter. It's like a secret ingredient that adds a nutty whisper to the dessert.
For a more caramelized crust, sprinkle a little bit of sugar on top of the clafoutis before baking. It's like adding a touch of magic to make it extra crispy.
To make sure that the fruit cooks evenly, you can place a baking sheet on the rack below the clafoutis. This is like building a little shield to protect the bottom from burning.
If you're short on time, you can use frozen fruit in your clafoutis. Just make sure to drain it well before adding it to the batter.
And finally, don't be afraid to experiment with different flavors! You can add a little bit of lemon zest or orange zest to the batter for a refreshing twist. You can also add a pinch of cinnamon or nutmeg for a warm, comforting flavor.
The possibilities are endless! So get creative and have fun with it.
Remember, a clafoutis is a simple dessert, but it's also a delicious one. It's perfect for a casual weeknight dessert or a fancy dinner party. So next time you're looking for a new dessert to try, give the clafoutis a shot. You won't be disappointed!
If you're looking for more dessert recipes, check out my other posts on my website. I have a recipe for Queen Amann, which is a delicious French pastry, and a recipe for Portuguese egg tarts, which are a classic Portuguese dessert.
Baking the Clafoutis: Tips for Perfect Results
Final Thought
There you have it, the secrets to making a perfect clafoutis! With a little practice, you’ll be whipping up this French delight in no time. Remember, the beauty of clafoutis lies in its simplicity. Don’t be afraid to experiment with different fruits, flavors, and toppings. Let your creativity shine and enjoy the process of creating a truly unique and delicious dessert. So go forth, bake with confidence, and share the joy of clafoutis with your loved ones! And if you're looking for more delicious dessert recipes, be sure to visit my website, tauhuichiban.com, for more culinary adventures.